Why Children Are More Vulnerable To Toxic Home Builds & Remodels (And What To Do About It!)
Discover why protecting your family from hidden toxins during custom home construction or renovation is crucial. From understanding children's vulnerability to identifying common toxins like lead and formaldehyde, learn actionable tips to ensure a safe and healthy environment for your loved ones. With insights on choosing safe building materials and navigating the construction process with care, find out how to partner with a non-toxic home builder for a healthier home in the San Antonio area.
Children depend on adults for everything, including protection from environmental threats. While building or remodeling your home is exciting, what if it puts your children's health at risk? Unfortunately, hidden toxins in paint, flooring, water, air, and elsewhere can pose a serious threat to developing bodies.
This blog explores the unsettling truth regarding children’s increased vulnerability to environmental toxins common in home builds and remodels. Unlike adults, their organs and immune systems are still under construction, making them less equipped to fight off these harmful substances.
Here's what you'll learn:
Why children are anatomically, physiologically, and behaviorally more susceptible to toxins during a home build or renovation.
Where toxins like lead, mercury, arsenic, formaldehyde, and VOCs may lurk in your home.
Tips for protecting children during construction: Gain actionable advice on open communication with contractors, lead testing, limiting exposure, ventilation strategies, and choosing safe building materials.
How to take action and create a safe, healthy home for your little ones.
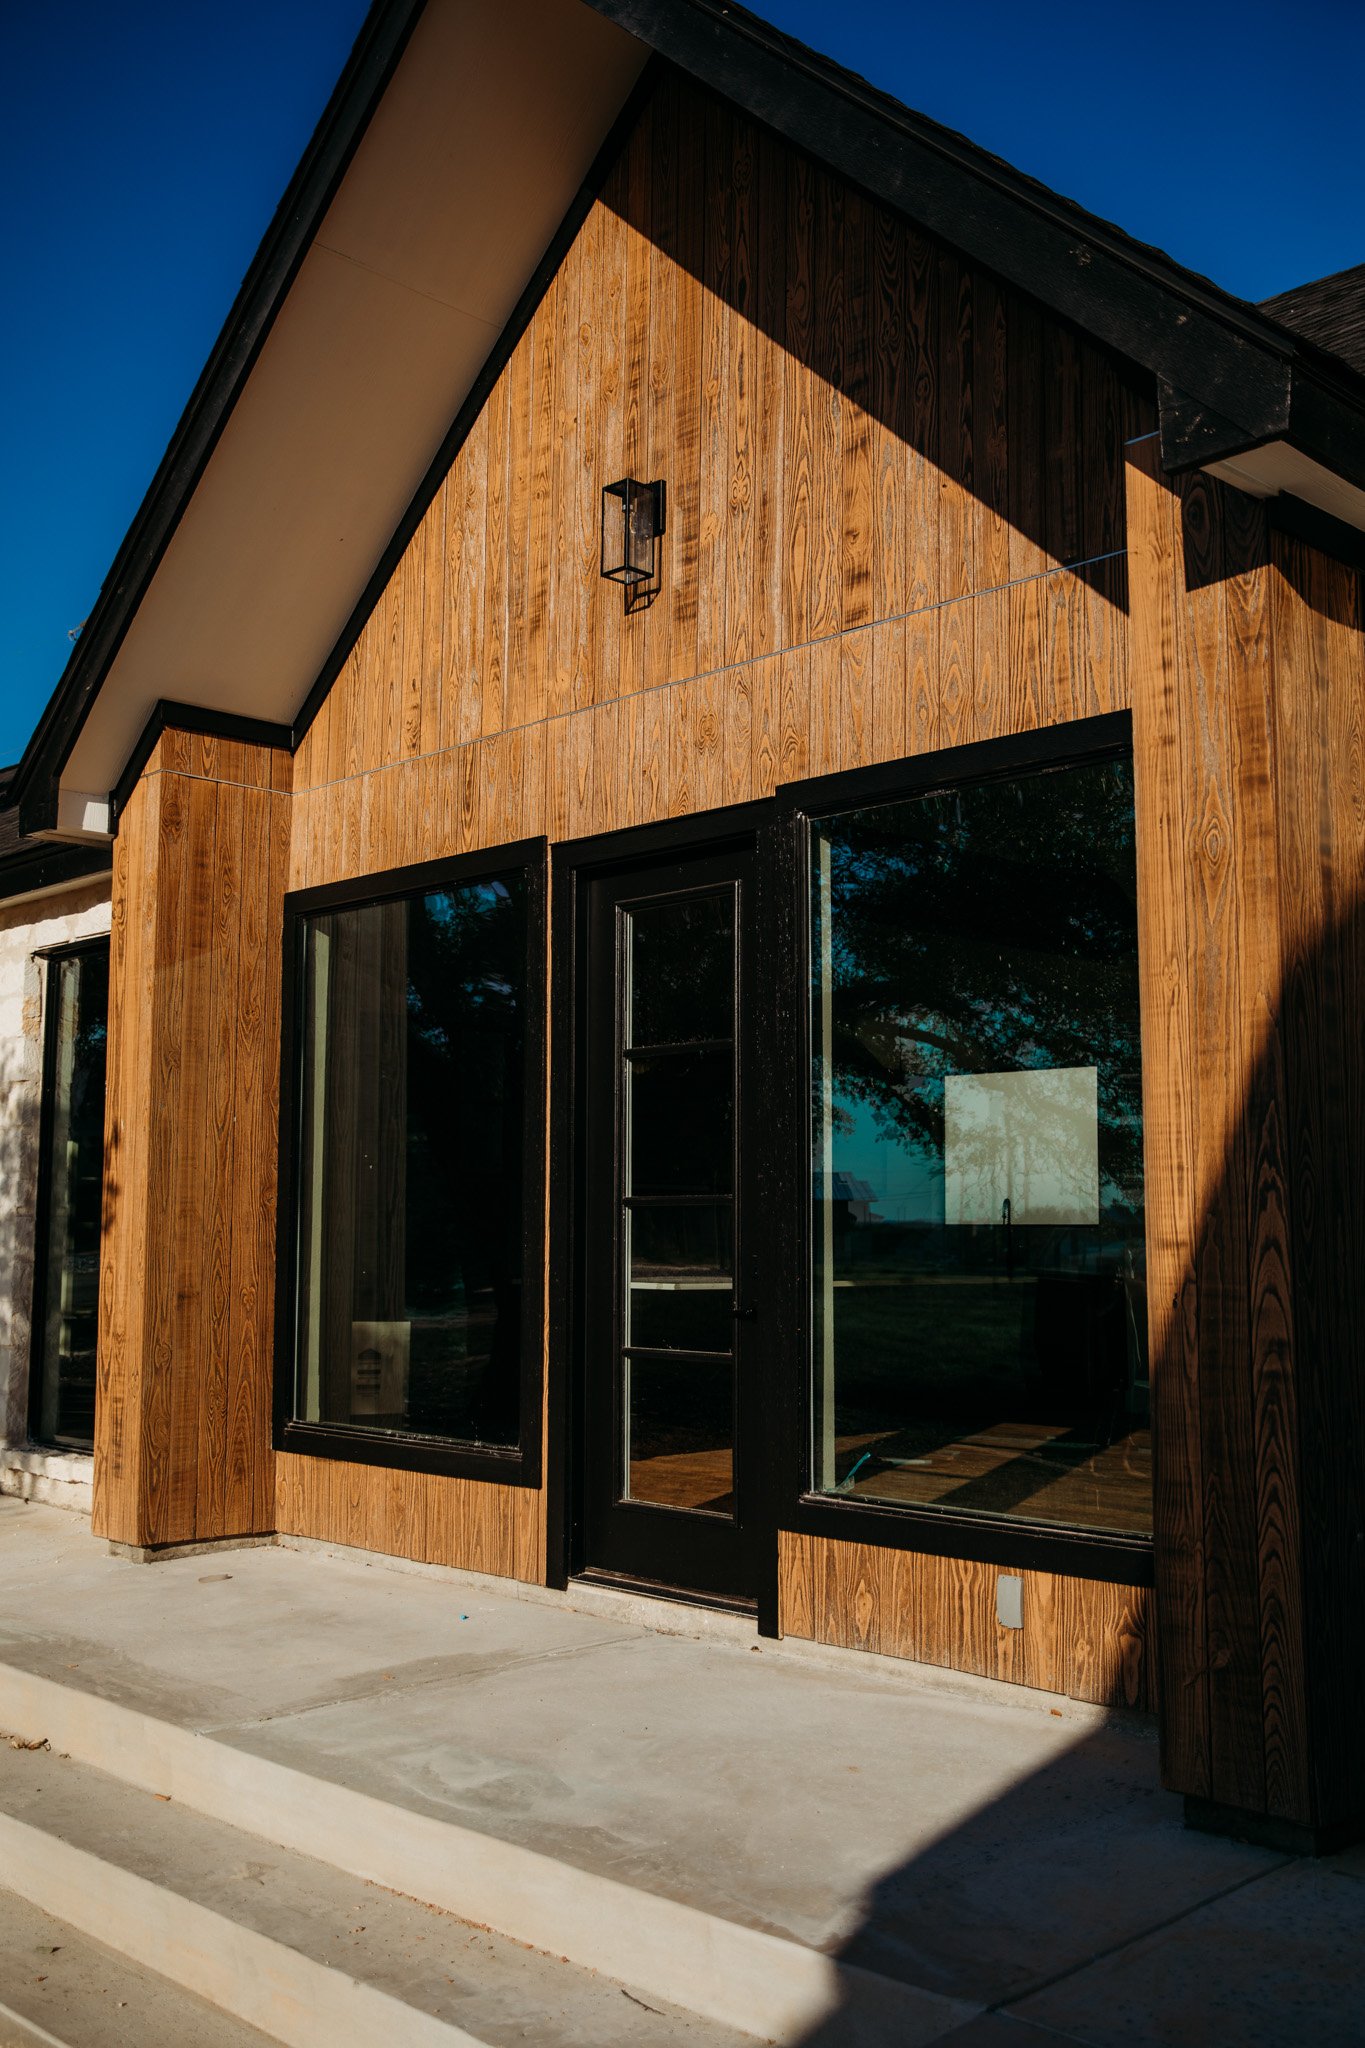
PC: https://doveeyesphotography.mypixieset.com/
Why are children more vulnerable to environmental toxins?
Children's bodies are still developing. Their organs and immune systems are immature and less equipped to detoxify and eliminate harmful substances. Additionally, their behavior and physiology put them at a higher risk of exposure .
Understanding Anatomy, Organ Immaturity, and Behavior:
Respiration: Compared to adults, children breathe more air in proportion to their body weight. This means they inhale more dust, chemicals, and other pollutants present in the air.
Increased Hand-to-Mouth Activity: Young children explore the world through their mouths, putting them at risk of ingesting dust, lead paint chips, or other contaminated objects.
Skin Absorption: Children's skin is thinner and more permeable, allowing toxins to enter the bloodstream more readily through contact.
Developing Organs: Organs like the brain, lungs, and immune system are still maturing in children. These organs are less equipped to eliminate toxins and more susceptible to lasting negative effects.
Higher Water Intake: Children also have a proportionately larger daily water intake. This means they may ingest more contaminants present in drinking water.
Behavioral Considerations: Children's curiosity and tendency to explore their environment can put them at an additional disadvantage. They might not understand the dangers of lead paint chips or contaminated dust, increasing their risk of accidental ingestion.

Where Might Toxins Be Found in Your Home Build or Remodel?
Lead:
Primary Concern: Lead paint.
Locations: Homes built before 1978 may have lead-based paint on walls, trim, doors, and even window sills. Lead dust can also be created during renovation projects that disturb lead paint.
Mercury:
Primary Concern: Fluorescent bulbs and certain thermostats.
Locations: Older fluorescent bulbs can contain mercury. Consider using LED alternatives during a remodel. Some older thermostats may also contain mercury.
Arsenic:
Primary Concern: Treated wood and contaminated soil.
Locations: Arsenic-treated wood can be used for decks, fencing, or even some types of landscaping timbers. Settling dust from contaminated soil can enter your home.
Formaldehyde (this one is a biggie in construction):
Primary Concern: Pressed wood products, adhesives, and some insulation materials.
Locations: Particleboard, plywood, and MDF (medium-density fiberboard) are all common building materials that can emit formaldehyde. These are often used in cabinets, furniture, and flooring. Urea-formaldehyde adhesives are used in some plywood and particleboard products. Spray foam insulation can also off-gas formaldehyde. (Check out this blog post on non-toxic insulation.)
Volatile Organic Compounds (VOCs):
Primary Concern: Paints, stains, varnishes, adhesives, and cleaning products.
Locations: During construction or remodeling, VOCs can be emitted from these products as they dry or cure. Opting for low-VOC alternatives can significantly reduce exposure.

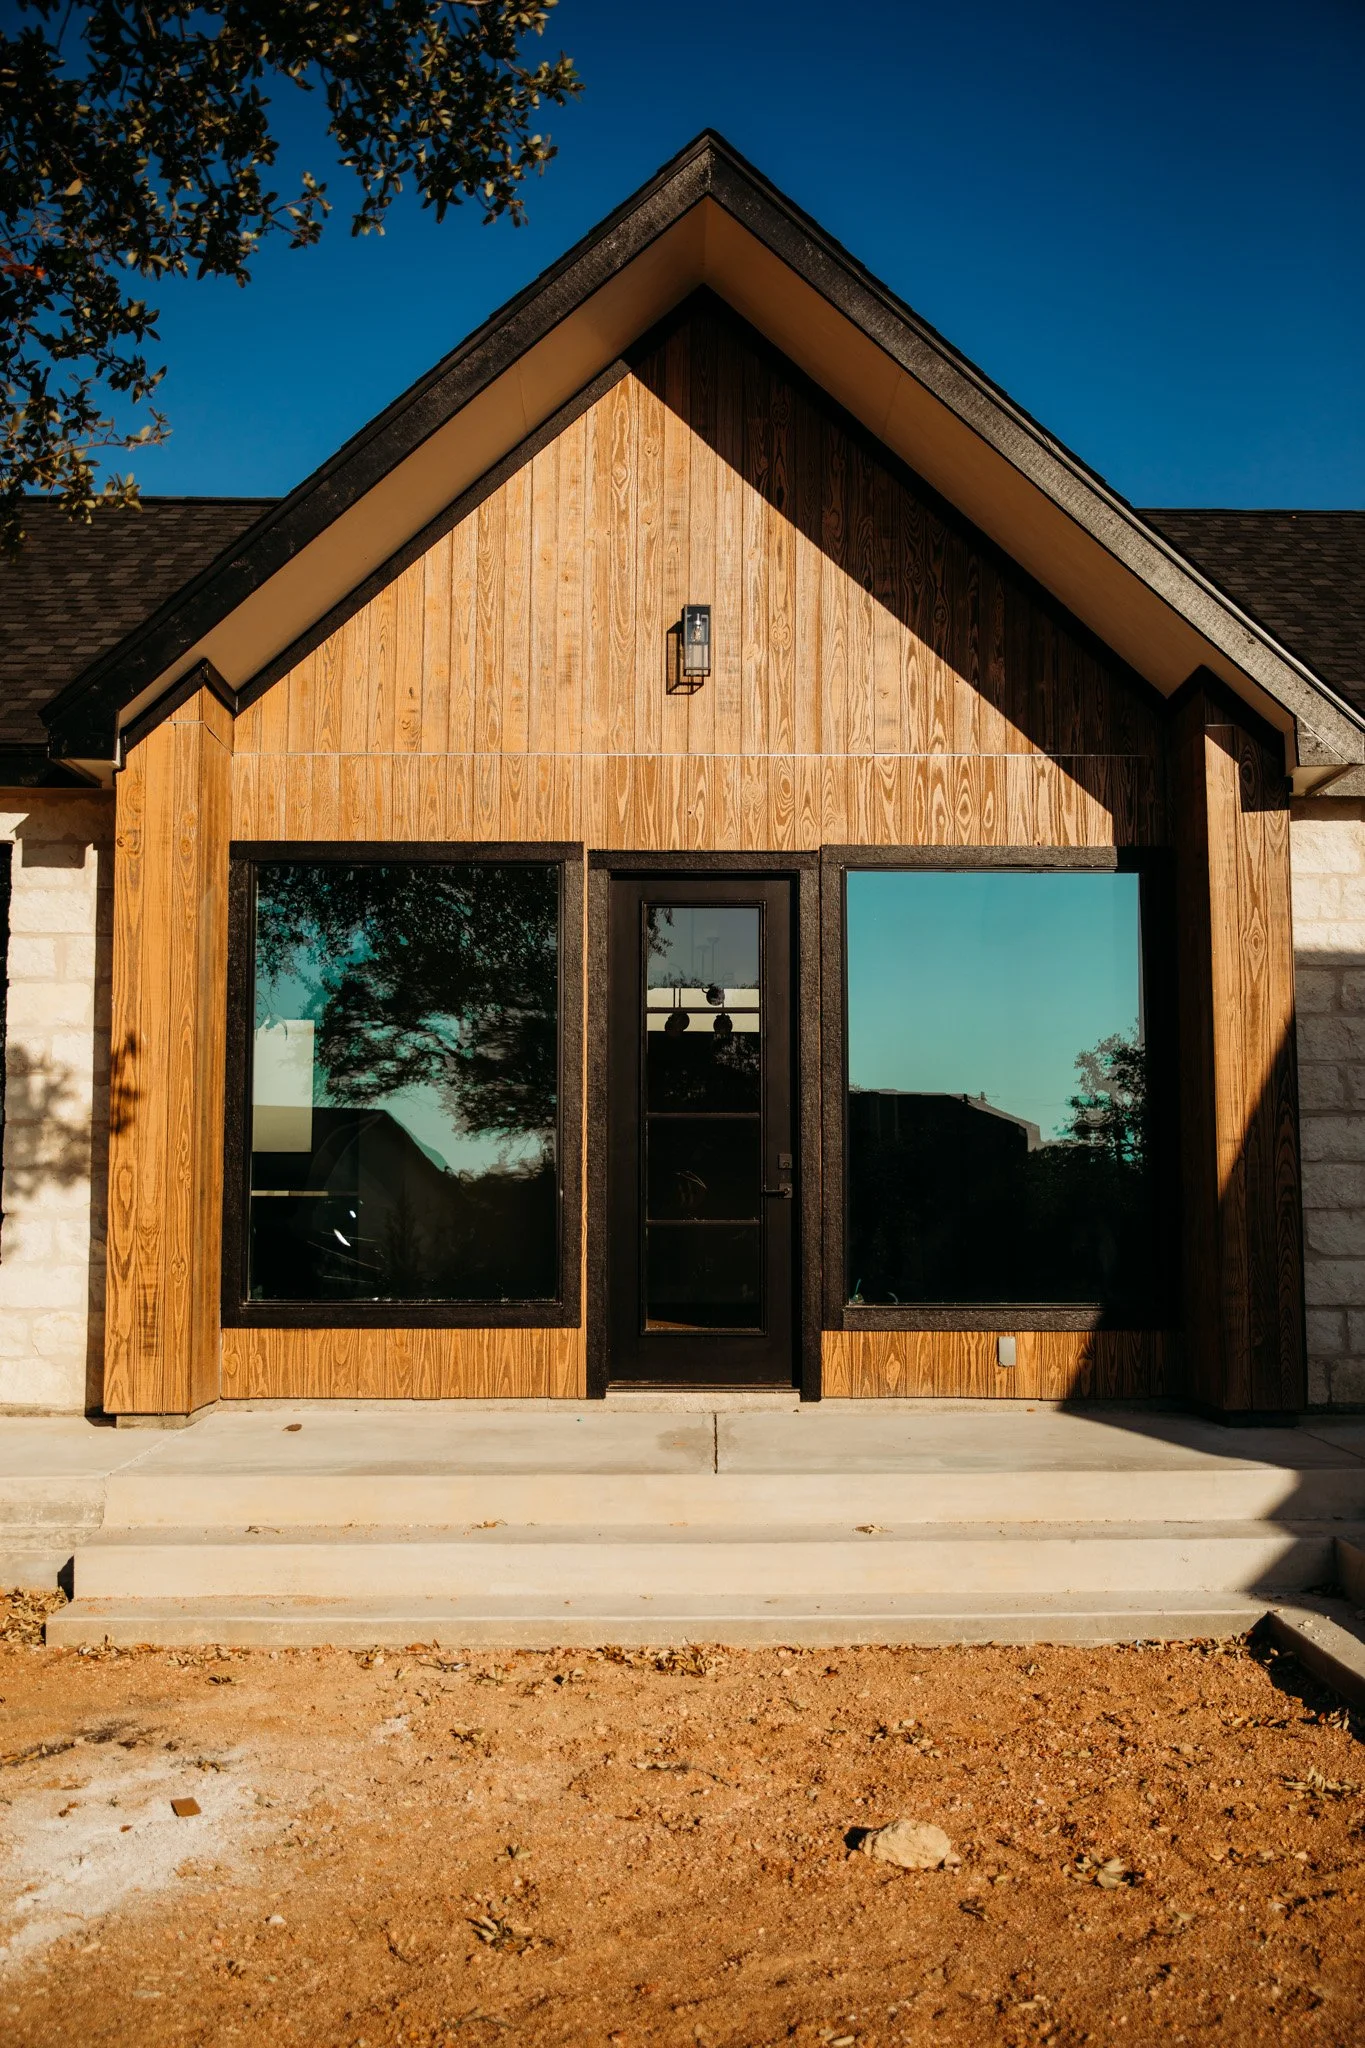
PC: https://doveeyesphotography.mypixieset.com/
How To Protect Children During Home Construction and Remodeling
Open Communication with Your Contractor: Discuss your concerns about environmental toxins and safety from the very beginning. Choose a contractor knowledgeable in low-VOC materials and lead-safe practices (if remodeling an older home).
Lead Testing: If your home was built before 1978, have it tested for lead paint by a certified professional. If lead is found, don't attempt to remove it yourself. Hire a lead-abatement contractor who can safely remove the lead paint.
Limit Time Spent in the Construction Zone: Restrict your children's access to the construction area to minimize their exposure to dust and fumes. Avoid site visits during active construction and keep your kids out of the house during a renovation.
Check out this previous blog “Should You Live In Your Home While Renovating?”
Ventilation Is Your Friend: Open windows and doors whenever possible during and after construction to promote air circulation and remove lingering odors. This helps remove dust particles and VOCs that may off-gas from new materials. This is also important to consider when selecting a move-in date for a new home as you want to ensure all materials have completed off-gassing.
Invest in Safe and Healthy Building Materials: Super important! Work with your contractor to choose low-VOC paints, adhesives, and building materials whenever possible. These products emit fewer harmful chemicals and can create a healthier indoor environment for your family.
Download “10 Non-Toxic Swaps For Your Custome Home”
Building a healthy home is an investment in the health and well-being of your family. By understanding where you and your family are vulnerable, you can create a safe and nurturing environment where even the littlest ones thrive!
P.S. Curious about non-toxic materials to use during your renovation? Download “10 Non-Toxic Swaps For Your Custom Home”

Non-Toxic Home Building: Insulation for Healthy Homes
Discover the best non-toxic home-building solutions in San Antonio. Learn about different insulation types, costs, and factors to consider. Make an informed decision for a sustainable and healthy home.

https://doveeyesphotography.mypixieset.com/
Today we are diving DEEP into non-toxic insulation for your healthy home-build. To briefly summarize:
Spray foam is considered the most effective for air sealing and resisting heat flow in the short term, but is saturated with chemicals/toxins and loses its integrity over time.
Fiberglass is the cheapest insulation option but has an average performance quality and often contains formaldehyde and fire retardants
Cellulose is another less expensive option that also contains few chemicals, however, it has a similarly average performance quality
Mineral and spray wool are considered the most non-toxic, have superior sound-proofing, the spray or blown-in option is highly effective for air sealing, and cost less than spray foam.
If building a non-toxic home is your goal, download “10 Non-Toxic Swaps For Your Custom Home”!
Read on for all of the details so you can make the best insulation choice for your non-toxic home.
The Concern for Toxins in Insulation
Insulation is one of the most important factors in keeping your home comfortable and the energy bill low. It helps to keep your home cool in the summer, warm in the winter, and can also help to reduce noise levels.
However, traditional insulation has been laden with chemicals in the form of formaldehyde and fire retardants. So how do you make the healthiest decision for your family and your home?
Today we are going to share an overview of the primary forms of insulation along with their respective advantages and disadvantages. At the end of the day, you will have to choose the insulation that supports your health, climate, AND budget.
Home Insulation Terminology
But first, let’s review some basic terminology:
R-value: The R-value of an insulation material measures its resistance to heat flow. The higher the R-value, the more effective the insulation.
Fire resistance: The fire resistance of an insulation material measures how well it can withstand fire. Insulation materials with a high fire resistance rating can help slow the spread of fire and protect your home in the event of a fire.
Air sealing: Air sealing measures how well an insulation material can prevent air leaks. Air leaks can reduce the effectiveness of your insulation and increase your energy bills.
Soundproofing: Soundproofing measures how well an insulation material can reduce noise levels. Insulation materials with a high soundproofing rating can help to create a more peaceful and comfortable home.
https://doveeyesphotography.mypixieset.com/
Primary Home Insulation Types
Fiberglass: Fiberglass is the most common type of insulation used in homes. It is made from thin glass fibers that are bonded together with a resin. Fiberglass insulation is relatively inexpensive and easy to install, but it can be irritating to the skin and eyes.
Cellulose: Cellulose insulation is made from recycled paper products, such as newspapers and cardboard. It is a good choice for homeowners who are looking for a non-toxic and environmentally friendly insulation option. Cellulose insulation is also relatively inexpensive, but it can be more difficult to install than fiberglass insulation.
Mineral wool: Mineral wool insulation is made from natural materials, such as rock or slag. It is a good choice for homeowners who are looking for a fire-resistant and soundproofing insulation option. Mineral wool insulation is more expensive than fiberglass or cellulose insulation, but it is also more durable and long-lasting.
Spray foam: Spray foam insulation is the most effective type of insulation available. It is made from a mixture of chemicals that are sprayed onto surfaces to form a seamless barrier. Spray foam insulation is very good at sealing air leaks and preventing heat loss. However, it is also the most expensive type of insulation and can be difficult to install.
Rigid foam: Rigid foam insulation is made from a variety of materials, such as polystyrene, polyurethane, and polyisocyanurate. It is a good choice for insulating walls, floors, and roofs. Rigid foam insulation is relatively inexpensive and easy to install, but it is not as effective at sealing air leaks as spray foam insulation.
Spray wool: Spray wool is a type of insulation made from molten rock or wool that is sprayed on surfaces to form a seamless barrier. It has a number of advantages over other types of insulation, including:
High R-value: Spray wool has an R-value of >4 per inch. This means that it provides excellent thermal insulation, helping to keep your home cool in the summer and warm in the winter.
Airtightness: Spray wool forms a continuous seal, preventing air leaks from occurring. This can help to improve energy efficiency and reduce drafts.
Fire resistance: Spray wool is non-combustible and has a high melting point, making it an excellent choice for fire protection.
Soundproofing: Spray wool can also help to reduce noise levels, making your home more peaceful and comfortable.
Wool is naturally mold-resistant
Factors to Consider When Choosing Insulation
There are several factors to consider when choosing insulation for your home, including:
Climate: The type of insulation you choose will depend on the climate you live in. If you live in a cold climate, you will need insulation with a high R-value. The R-value of an insulation material measures its resistance to heat flow. The higher the R-value, the better the insulation.
Budget: Insulation costs can vary depending on the type of insulation you choose and the amount of insulation you need. Fiberglass and cellulose insulation are the least expensive types of insulation, while spray foam insulation is the most expensive.
Fire resistance: If you live in an area with a high risk of wildfires, you may want to choose an insulation material with a high fire resistance rating. Spray wool and mineral wool insulation have high fire resistance ratings.
Soundproofing: If you are concerned about noise levels, you may want to choose an insulation material with a high soundproofing rating. Mineral wool and spray wool insulation have high soundproofing ratings.
Comparison Breakdown
The following table provides a comparison breakdown of the primary forms of insulation, including spray wool:
Insulation Type | R-Value per Inch | Fire Resistance | Air Sealing | Soundproofing | Average Cost
Fiberglass | 3.1-4.3 | Good | Good | Fair | $0.50-$0.90
Cellulose | 3.7-3.8 | Good | Good | Good | $0.60-$1.00
Mineral Wool | 3.2-4.3 | Good | Good | Good | $0.70-$1.10
Spray Foam | 6.5-7 | Excellent | Excellent | Fair | $1.20-$2.00 Rigid Foam | 4.1-7 | Excellent | Excellent | Fair | $1.00-$1.50
Spray Wool | 4.3 | Excellent | Excellent | Good | $0.90-$1.50
Non-Toxic Home Insulation Recommendations
If you are looking for non-toxic insulation, mineral wool and spray wool are good options! Both materials are made from natural materials, are renewable and sustainable, and do not contain any added chemicals or flame retardants.
Mineral wool is more budget-friendly while still remaining non-toxic and effective. Spray wool is a good choice for homeowners who are looking for the most effective insulation possible. However, both options are traditionally less expensive than spray foam.
Conclusion
The best type of insulation for your home is a personal decision that depends on your budget, climate, and specific needs. However, if it were up to us, we would choose between the spray-on options for rock wool and sheep’s wool. Some brands to consider are Havelock, American Rockwool, and Oregon Sheppard.
Here’s to having healthier homes!
P.S. Looking for more non-toxic home-building materials? Check out this blog post on plywood and download “10 Non-Toxic Swaps For Your Custom Home”!
The Foundation of Non-Toxic Home Building: In-Duct Air Purification Systems
Creating a non-toxic home in San Antonio isn't a mystery. Breathe easy with an in-duct air purification system. Skip the hassle of room purifiers. Learn how we make clean, pure air a reality. Say farewell to toxins and welcome a healthier home with JD Rock Construction.
Creating a non-toxic home can feel like an overwhelming task, with a myriad of decisions to make. But, here's a secret: you can simplify the journey by focusing on one of the most critical aspects of indoor air quality – in-duct air purification systems.
Picture this: Instead of shelling out thousands of dollars for bulky air purifiers in every room, you can invest around $500 in an in-duct purification system that cleanses the air throughout your entire home. The best part? If you're building a new home from the ground up, the additional installation cost is almost negligible because your HVAC technician is already on-site.
Why is air purification a cornerstone of non-toxic home building?
Well, it's no secret that our indoor air can harbor undesirable particles. While we aim to minimize these pollutants, an air purifier steps in to bridge the gap where we might fall short.
But not all air purifiers are created equal. When considering an in-duct air purification system for your home, look for one that goes beyond the basics of dust and pollen. Seek out a system that filters out VOCs (Volatile Organic Compounds), which can emanate from common household items like paints, cleaning products, and furniture.
Mold spores are another concern for indoor air quality. A top-notch in-duct purifier should be efficient at trapping these potentially harmful particles. And if you have a bustling household with kids, consider a system that can tackle viruses, adding an extra layer of protection to your home.
So, why start with air quality when building a non-toxic home?
It's simple – because it's a foundational step that immediately impacts your well-being. When your home's air is clean and fresh, you'll experience improved health, fewer allergies, and greater peace of mind.
At JD Rock Construction, we understand that creating a non-toxic home can feel like a daunting task. That's why we're here to guide you, step by step, through this journey. With an in-duct air purification system in place, you're not only investing in your family's health but also simplifying the path to a non-toxic home that aligns with your values.
Ready to take the first step towards a cleaner, healthier home? Reach out to us today and discover how we can help you build the non-toxic home of your dreams.
Remember, it's not about overwhelming yourself with decisions; it's about taking things one step at a time and focusing on what truly matters – the well-being of your loved ones.

How to Build Your Home FAST
A delay in material selections for a custom home will delay the whole project. If all of the materials are selected up front, the builder can purchase proactively and swiftly churn through the work. The result is a home-building journey with decreased stress and increased speed- a win-win!
In my personal experience, the single biggest reason projects take longer than anticipated is due to delays in material selections. Now, this may sound like I am blaming the client. FALSE. I am blaming the builder (me). I failed to communicate the importance of timely selections and deadlines. That ends today! It is imperative that ALL material selections be made by the client by the time the house is framed. In fact, by the time the foundation is poured, most selections should be made.
That may sound a bit ridiculous to some of you. That is so early in the construction process!!! To help you understand, allow me to explain what happens between you making a selection and the material being installed. Let’s take tile, for example. Here are the steps that must happen to install your selected tile:
A material “takeoff” needs to be performed. A material takeoff is when measurements are taken from the house plans to determine the needed quantity of a certain material (i.e. tile). Plans do not tell you the square footage of tile in a specific area (i.e. shower). A material takeoff must be performed to determine this quantity. It is simple mathematics, but it does take a bit of time – especially when multiple materials are selected for a certain area. (TIME FOR THIS STEP – 3 TO 5 DAYS)
Retrieve quotes from tile vendors. Once we know the exact amount of tile needed, we can send a quote request to the desired vendor. (TIME FOR THIS STEP – 3 TO 5 DAYS)
Request pricing approval from the client. Since most material selections are linked to “allowance items” (see our earlier blog post about allowances), the client must approve the cost of a material before it is purchased. Continuing the tile example, if there was a $10K allowance for tile material, and the vendor’s quote came back at $11K, then the builder must receive written approval from the client regarding the overage. (TIME FOR THIS STEP – 3 TO 5 DAYS)
Purchase material. Once the quotes are reviewed by the builder and approved by the client, it is time to purchase the material! Very rarely are materials like tile in stock and ready to be picked up. They can have a lead time of a week to months, depending on the tile. (TIME FOR THIS STEP FROM PURCHASE TO READY FOR PICKUP – 3 WEEKS ON AVERAGE).
Install material. (TIME FOR THIS STEP – 5 DAYS)
The steps above must take place for every single material that needs to be selected for your home. As you can see in the tile example, it would be very unwise to wait until the builder was ready for the tile to be installed to make your selection. If you wait that long, there will be major project delays. If all of the materials are selected up front, the builder can purchase proactively and swiftly churn through the work. The result is a home-building journey with decreased stress and increased speed- a win-win!

Fun and Practical Features to Include in Your Custom Home
If you are planning to build a custom home, you don’t want to miss these fun and practical features to include!
Are you planning to build a custom home soon? We’ve got some fun and practical ideas for you to consider…
Coffee Bar in the Main Bedroom
For you coffee drinkers out there, consider this! How nice would it be to not have to leave your bedroom to get your coffee in the morning? Talk to your architect about running plumbing and electrical to a little nook in your bedroom for some early morning cappuccinos.
Indoor Gun Range
Yeah, we said it. If you have flexibility in your budget, include space for your hobbies in your home. An indoor gun range may not be as expensive as you think – it is actually fairly simple to construct (and yes – it is legal). You can buy a target retrieval system online for less than $1,500. Once all of your walls are soundproofed and padded, and the right lighting is in place – you’re all set for many hours of fun!
Splurge on the Main Shower
Get the rain showerhead. Throw in a body spray or two. Add another showerhead in case you don’t like showering alone. Install a recessed light with a built-in Bluetooth speaker so you can listen to your audiobook. All of these splurges are well worth the minimal extra costs.
Central Vacuum System
Once again – another minimal cost with a high payoff would be a central vacuum system. It is such a pain to have to go grab your vacuum cleaner and plug it in just to vacuum some crumbs off the floor after dinner (parents of toddlers- I know you feel this). Consider installing a central vacuum system with built-in vacuums for all the main rooms of your home!
Hot Tub
Do we really need to sell you on this one? Turn Netflix off, invite your friends over, and end your day in the hot tub on your back patio. You’ll thank us later.
We hope these added flourishes bring you so much enjoyment during, and long after, your custom home build!

Peace of Mind Starts With Your Budget
What’s your custom home build budget? Should you max out your construction loan? How can you establish a cash reserve? How do you maintain peace during your custom home construction? We discuss these and more in today’s blog.
I worked on 4 different Cost-Plus Contracts in 2022. We unpacked the details involved in this kind of contract in a previous blog, but, essentially, the clients saw all of our numbers on the job and were on the hook for any overages to the budget. For the most part, these projects all came in with budget overages of less than 1% of the project cost (which is amazing!). However, I noticed that when clients selected their finish-out (think lighting, plumbing fixtures, flooring, hardware, all the pretty things), they wished they had a bigger finish-out budget. No matter how small or vast the budget, the client had typically obtained the largest construction loan they could afford. As a result, they tended to feel stressed about every little decision along the way because they could just barely afford the project. This inevitably results in a miserable construction experience for both the client and builder. Financial strain supercharges every decision with emotion.
On a smaller scale, consider a car- I could probably go out today and find somebody to loan me money for a brand-new Lexus with all the bells and whistles. But because this would be a financial strain for me, I could never enjoy the car. I would need to sacrifice my current quality of life and luxuries just for the fancy car. So I would miserably drive the car around town. Is that car really worth it? The same concept applies to a custom home.
I would strongly advise my future clients to not max out on the largest loan possible. I would strongly advise my future clients to have some fluff in their budget so that the unexpected is less stressful and they can comfortably pick their actual favorites when it’s time to select wood flooring and bathroom tile. One strategy I recommend is to budget for 5-10% less than your max in order to establish a cash reserve. Another easy way to have breathing room in your budget is to not build the biggest house possible. If a house costs you $225/square foot, then 100 square feet would cost $22,500. Now, some people reading this may genuinely need the larger home over a nicer finish out. Everyone’s situation is different! All I want to do is encourage you to not bite off more than you can chew with a loan, and remind you that peace of mind is ALWAYS better than a bigger or fancier home. Build something you will love, not something you will regret.

The Truth About Price Per Square Foot
“What is your price per square foot?” This is the first question most often asked of a home builder and is, also, one of the most difficult to answer. Because the answer is more complicated, we want to help you better understand what is truly involved. It would be incredibly unfortunate for a client to hire a home builder under misunderstood conditions.
So- What does the price per square foot mean? There are 2 parts to this equation. The price takes into account the total cost of all labor, materials, and management for the project. The square footage accounts for the total living area (emphasis on the living). The total living area includes all the areas that will receive heating and cooling. Therefore, a garage that does not receive heating and cooling, will not be included. Likewise, porches and driveways do not receive heating and cooling and are also excluded from the square footage.
Here’s an example to illustrate the calculation: Let’s say the house you want to build has 3,000 square feet of total living area, a 2-car garage, and a 40-foot-long driveway. The builder has quoted you $600,000 for the project. Therefore, the price per square foot would be $200 ($600,000 divided by 3,000 SF = $200/SF).
Now, consider building the same 3,000-square-foot house with a 4-car garage and an 80-foot-long driveway. Even though the total living area has not changed, the builder will be unable to build the home for $200 per square foot because he has to pay extra for the additional garage and driveway labor and materials. Because the total cost increased, the price per square foot will also increase. The same would be true if the square footage remained the same, but you decided to have all of the walls painted by a renowned artist or selected all appliances from Italy. When the total cost rises, the price per square foot must follow.
Hopefully, these examples make clear that the price per square foot is most impacted by the decisions of the client NOT the home builder. All custom home builders provide the exact same service. They hire the labor and purchase the materials to build exactly what you want. The same tile setter would be hired to install $1/square foot tile or $50/square foot tile. The same plumber would be hired to install standard Home Depot plumbing fixtures or the most expensive Kohler fixtures. When you see a “famous” home builder on Instagram posting photos of a gorgeous mansion in a celebrity neighborhood, they provide the exact same service as a home builder who builds a modest ranch house in the middle of nowhere. The price per square foot may be wildly different between the two, but both builders did the same thing- they managed the building of a custom home.
What distinguishes a builder is NOT their price per square foot; but their approachability and integrity. If you are considering building a custom home, you should absolutely get multiple bids on your house from builders in your area. You will find that they quote you roughly the same price per square foot. However, you should take the time to get to know each builder and determine whether or not you trust them. Determine whether or not you would be willing to communicate with them for the next year or so as they build your home. Then make the decision to hire the overall best home builder for YOU.

5 Tips to Save Big on a Custom Home
Our primary focus as a home builder is to make quality custom home building approachable; therefore, we want to help our clients save big so that quality custom homes are accessible to more and more people.
There are several ways to save big on a custom home WITHOUT affecting the overall quality of the finished product (and possibly allowing for even more budget allocation to enhance the finish-out of the home). It really is possible! Below are five tips for cost-saving changes in your home that can allow you to splurge on the finish-out of your home or simply save more money.
Lumber selection: choose 2”x4” lumber as opposed to 2”x6” for exterior walls. There is no significant difference in structural integrity between the two sizes. Make sure you hire a structural engineer and tell them you want 2”x4” walls to cut costs. This one swap could save anywhere from $12K to $30K.
Roof selection: choose a shingle instead of a metal roof. A metal roof can cost (on average) 3x to 4x the price of a shingle roof. Would you rather have an extra $30K to spend on the roof or the dream kitchen? I think you already know the answer.
General Contractor selection: Hire a home builder that minimizes overhead and focuses on a personal experience for significant cash savings. This is an intentional priority here at JD Rock Construction. As previously stated, our mission is to make beautiful custom homes approachable. We believe one way to accomplish this is to maintain a low level of entry through thoughtful consideration of all overhead expenses.
Exterior wall selection: For the walls that are viewed less often (the back and sides), consider Hardie board and batten or siding instead of solid rock or brick.
Number of plumbing fixtures: Plumbers always charge per fixture, NOT per square foot of the home. Therefore, it helps to be conscious of the number of plumbing fixtures you have in your home. Does a secondary bathroom really require two sinks? Giving every spare bedroom its own bathroom or additional sinks in a secondary bathroom will definitely cost more money. You can ballpark about $2,400/fixture (including labor and material). So, a standard bathroom with 3 fixtures (sink, toilet, and shower) would cost around $7,200.
Our hope is that these ideas inspire more people to consider that a custom home is possible for all kinds of budgets!

What to Expect When Expecting a JD Rock Custom Home
Bringing a new custom home into the world can feel a lot like bringing a child into the world. We outline what to expect when building a custom home with JD Rock in order to give you peace.
The custom home building journey is similar to that of bringing a child into the world. You are signing up for months of anticipation, a substantial expense, moments of uncertainty, moments of overwhelming joy, and inevitable labor pains with the ultimate reward of a new creation- “home”- on the other side. So what should you expect when embarking on this creative journey with JD Rock Construction?
Quality Work
We do not cut corners at JD Rock. For us, everything starts and ends with licensed engineers and inspectors. We will not commence a home build until we have a full set of engineered foundation and structural plans. Additionally, we won’t turn the house over to you until our work has passed all inspections. There is always the potential to save both time and money on a project by avoiding these professionals, but that is a risk we are not willing to take.
Honest Communication
Throughout the construction process, we will send you weekly updates on the progress of your home. These updates include considerable accomplishments on the project, recent purchases, snags we’ve encountered, as well as deliverables needed from you! Chiefly, we want to be honest with you. In construction, mistakes do happen. However, we hope that transparency will result in your trust and, ultimately, an enjoyable experience for us all!
True Custom Home Build Experience
We are not a hybrid-custom home builder. In a hybrid-custom experience, you may have limited options to choose the color of your walls, the tile size in your shower, etc. We are a true custom home builder. The sky’s the limit. If you find a sink you like on Pinterest, we’ll use it. If you’re into rustic cedar siding that only comes from Canada, we’ll get it down here. Your style is our style. If you aren’t ecstatic about your product selections, the objective of a custom home has not been achieved.
Quality work, honest communication, and a true custom home build experience are what set a JD Rock custom home build apart. We hope these fundamental pillars give you peace and confidence as you begin and prepare to meet your own custom home.

Lump Sum Contract v. Cost Plus Contract
Many people are surprised to learn that there are different ways to structure the contract for a custom home. Lump Sum and Cost plus are the two most common contract types. Learn about the pros and cons of each to make the best decision.
The big day has arrived- you researched and found the right custom home builder, hired an architect to draw up your house plans, and are now ready to sign the contract. Traditionally, this contract is structured in one of two ways: a Lump Sum Contract or a Cost Plus Contract. My hope is to explain these two types of contracts in a way that makes it clear which path is right for you and your custom home goals.
Path 1: Lump Sum Contract
In this contract, you and your builder have agreed upon one fixed price for all of the work shown in the plans and specifications. Once the contract is signed and construction begins, that price will never change. If the home builder ends up exceeding the budget on – let’s say the drywall – they will have to cover the difference out of their own pocket. You as the client will never have to worry about these overages.
Path 2: Cost Plus Contract
In this contract, you and your builder have agreed on a “starting point” price. Once the contract is signed and construction begins, you will be on the hook for all budget overages. Some people call this an “open book” contract. The builder will be legally responsible for showing you all their numbers, so you will know exactly what their expenses and profit are.
Which Path is Better?
I have used both contract types with clients, and both have their pros and cons. In general, I would say that a Lump Sum Contract produces a smoother, more seamless construction experience for the client. As previously mentioned, in a Lump Sum Contract, the client does not have to stress about the costs of their project once the contract is signed. There could be an instance, for example, where the window package comes in $12K over the builder’s budget. The client can visit the jobsite, admire the beautiful windows and never have to deal with the mental burden that these windows could have caused. In this crazy time with so much price fluctuation, the client can just enjoy the construction experience without the headache.
So why would you ever sign a Cost Plus Contract? Typically, you will get a better deal from the builder since they are sharing all numbers with you and are not liable for unexpected costs. Depending on the magnitude of the project, this could save you $20K to $50K. So yes, that could be some serious savings! Just be cautious- if you sign a Cost Plus Contract, are you prepared to spend $20K to $50K out of pocket for hiccups and surprises that come up along the way? Do you want to carry the mental burden for every expense throughout the entire construction process?
As you can see, there is no objectively right or wrong contract path to choose; however, there is likely a better and worse option for you depending on personality and goals. Hopefully you now possess the insight to make the best possible decision!

Should You Hire an Architect or Purchase Plans Online for Your Custom Home?
The desire to save money during a custom home build is completely understandable. However, use caution when considering purchasing architectural plans through an online vendor.
Purchasing house plans online instead of using an architect is one of the many decisions a client might make in an attempt to save money. However, this decision can just as easily become a money trap.
We are currently building a house for a client who purchased their plans online. As a result, there are three major hurdles we have had to overcome. This was NOT the client’s fault. At the time, JD Rock had never dealt with online plans and encouraged the client to pursue this route to save time and money. It has turned out to be a great learning experience for us that we hope can bless/save others.
HURDLE #1- Revisions
Shortly after purchasing the plans, the client requested a few tweaks to the design. They wanted to raise the gables on the front elevation and raise the first floor ceiling height from 9 to 10 feet. No big deal… right? I contacted the online vendor for the plans to figure out how to implement these revisions. I was then directed to the architect responsible for this specific set of plans. After numerous phone calls, voice mails and emails, I was redirected to the company subcontracted for plan revisions. Again, many voicemails and emails were required to reach this firm. Finally, they reviewed the revision request and sent a quote. For these “simple” revisions, their price was EXACTLY the same as the original set of plans purchased. I declined their proposal and hired an architect to simply redline (or markup) the set of plans already purchased. So hiring an architect in some capacity was still required and the resulting plans were no longer neat and pretty.
Also – the house plans purchased came with an engineered set of structural plans. But due to the adjusted ceiling heights and elevations, the whole house had to be re-engineered.
HURDLE #2- Site Plan
Because we used online plans, we did not have an official site plan for the house. When you hire an architect, they should first measure your property to determine what size and shape of home will fit. We never checked to see if the house would fit on the lot before purchasing the online plans. HUGE mistake! Luckily, the house (barely) fit, but it required pushing the house farther back into the lot than the HOA restrictions allowed. My legs are still sore from all of the hoop jumping I did to get this approved.
HURDLE #3- Clear Communication
Throughout the project, the client requested slight plan revisions here and there. Shift the windows two feet. Move the kitchen sink to the back wall. Scratch out the entire master bathroom and make it look like this instead. You get the idea. Customization is expected and encouraged in custom home building! If involved at the beginning, a professional architect would have likely uncovered many of these custom desires from the client in the initial design phase and then neatly laid out any subsequent adjustments. However, all of these changes can lead to major jobsite confusion for subcontractors if not communicated clearly through easy to read plans.
In the end, you have to make the decision that’s best for you and your family. Here’s my opinion: don’t waste time buying plans online. I’ll make one exception. If you have a large piece of property (let’s say 5+ acres), can honestly say that you won’t make a single change to the online plans, and have no HOA or building restrictions - then yes, you can and should buy the plans online. You will save some time and money. For everyone else, do your future self a favor and hire an architect.