
A Blueprint for Success
In this blog post, we discuss the importance of a site plan in the custom home-building process. A site plan is a detailed drawing that showcases the layout of the property, its dimensions, and the relationship between the proposed structure and the surroundings. It plays a pivotal role in maximizing the potential of the property, ensuring regulatory compliance, integrating design with the landscape, managing budget and resources, and facilitating effective communication with contractors. Investing time and effort into creating a comprehensive site plan sets the stage for a successful and efficient home-building journey. Let your site plan be the blueprint for your dream home's success and your peace of mind!
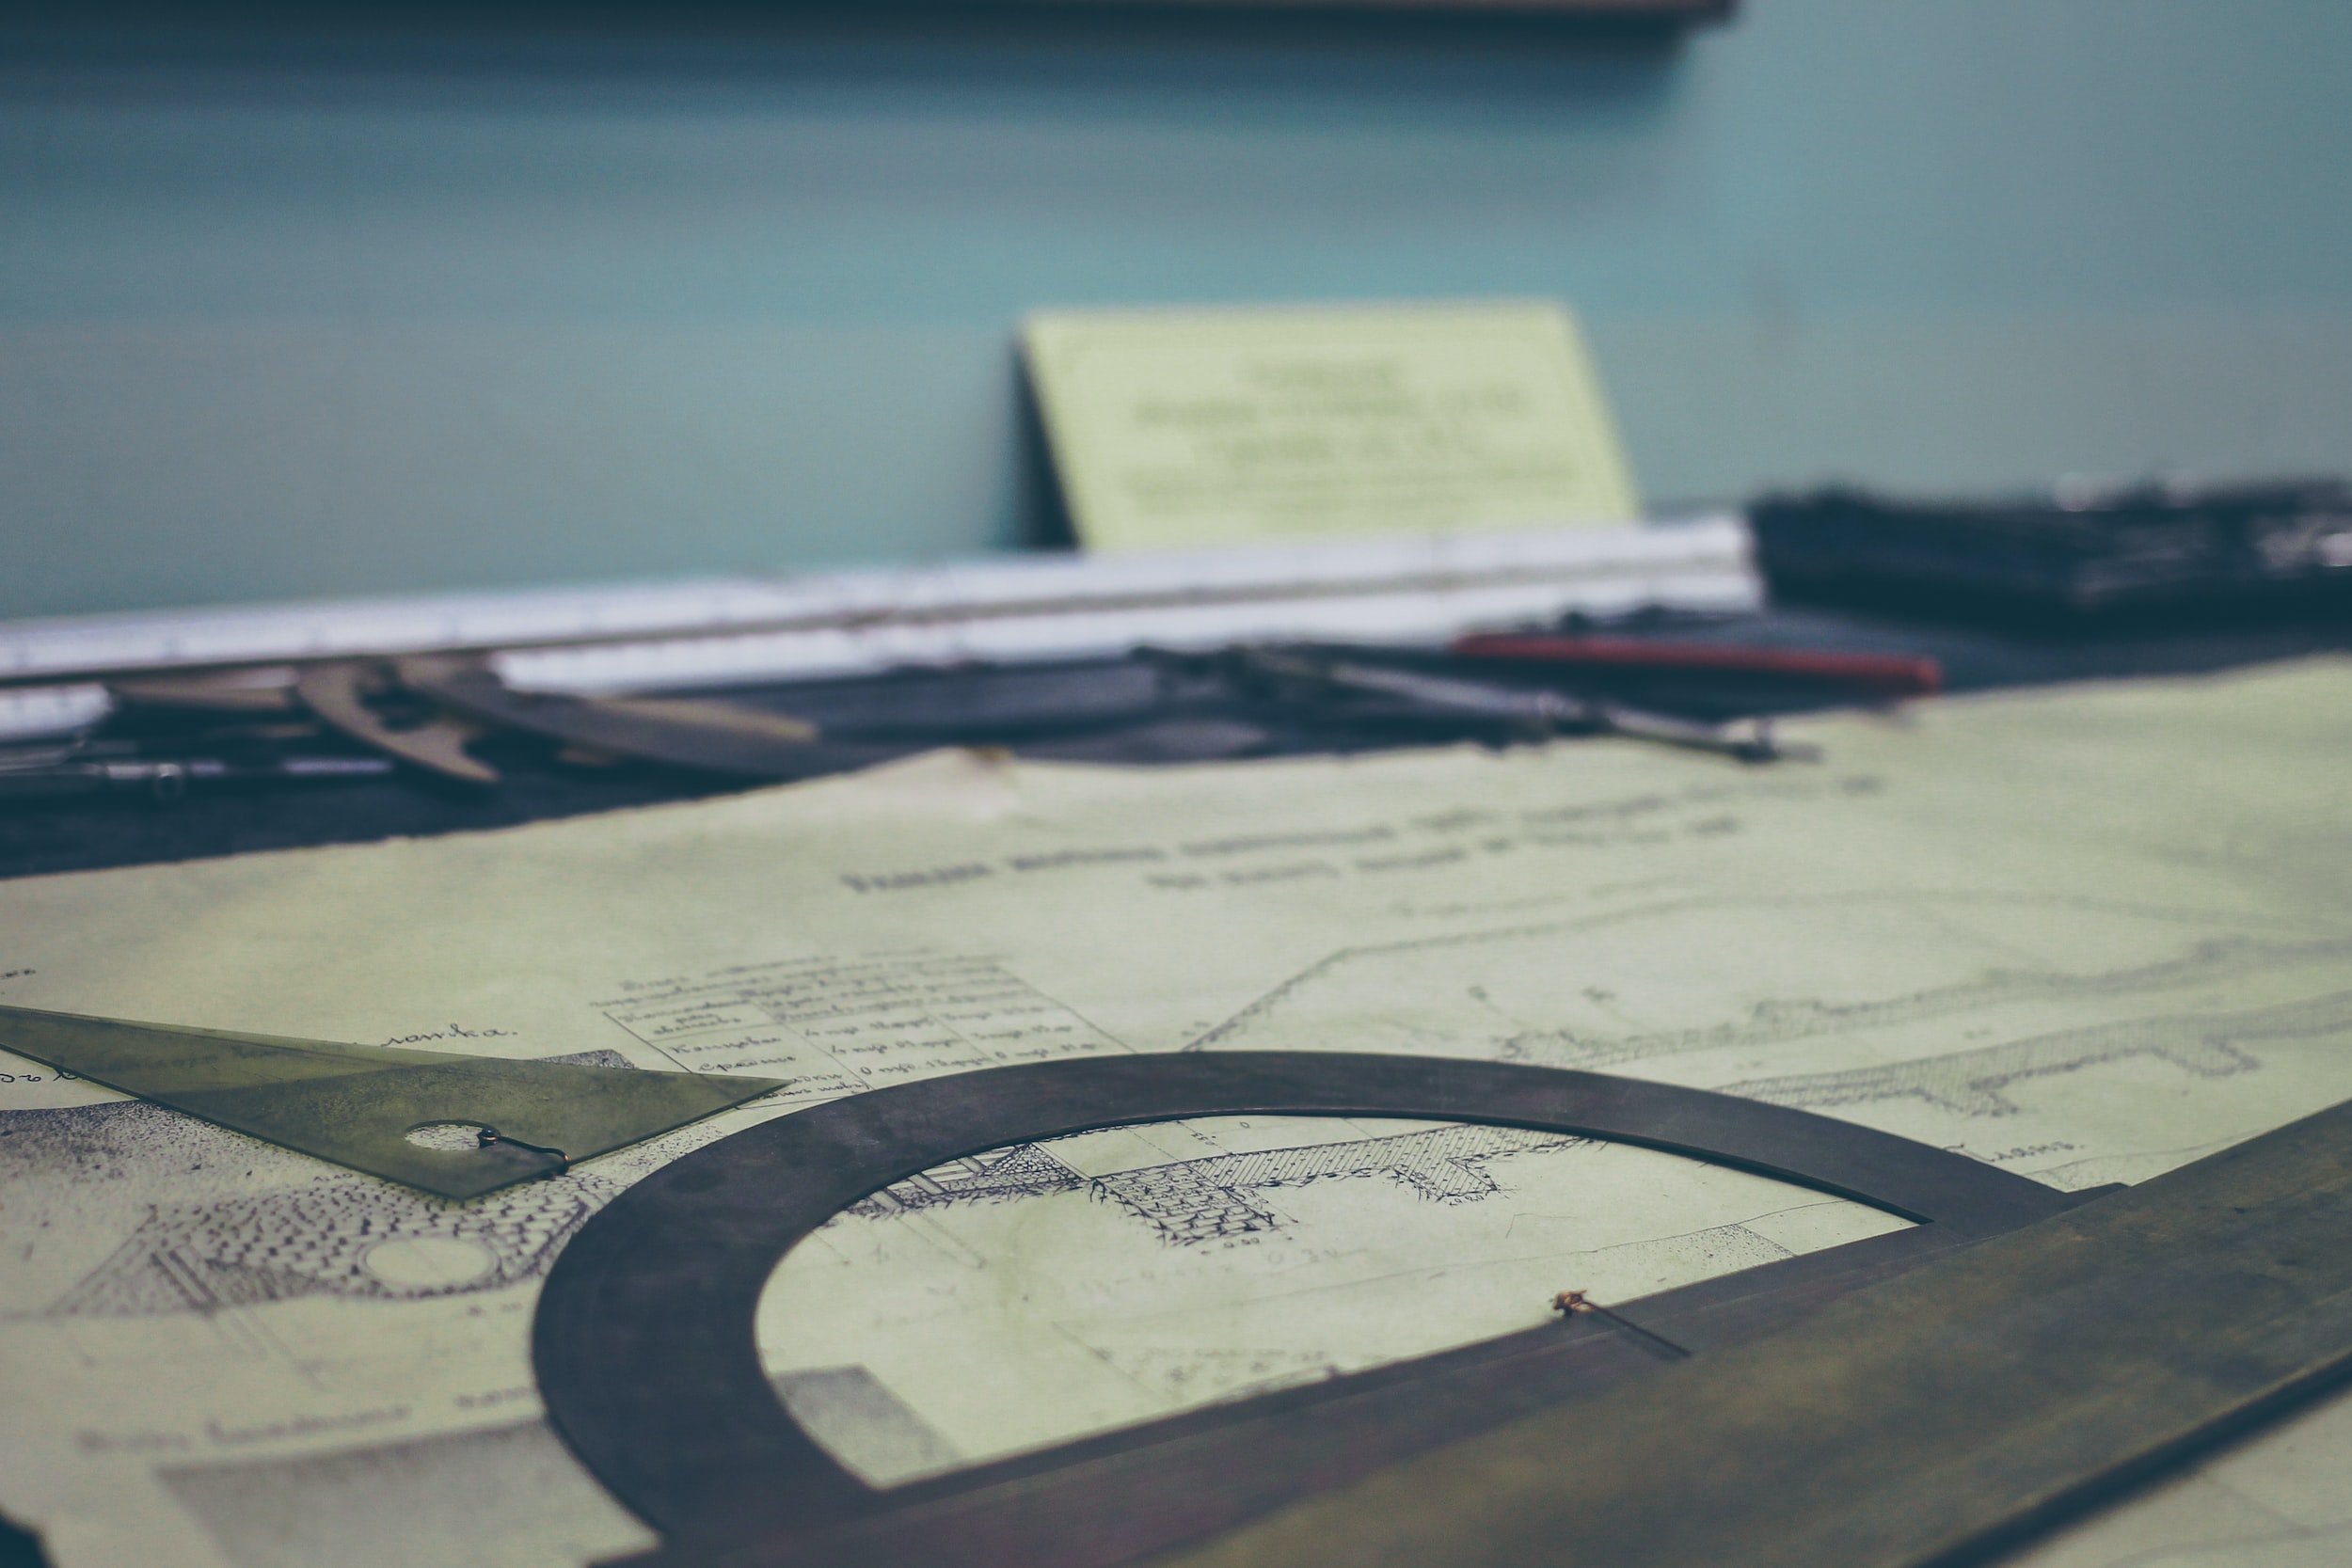
Today we are talking about an ESSENTIAL aspect, the bedrock even, of the entire custom home-building process. It provides a comprehensive visual representation of the property and plays a pivotal role in ensuring the success of your custom home project. Any guesses?!
What is a Site Plan?! (In classic Jeopardy style)
You guessed it- A site plan is a detailed and scaled drawing that showcases the layout of the property, its dimensions, and the relationship between the proposed structure and the surroundings. It encompasses crucial elements such as property boundaries, topography, existing structures, utilities, landscaping, access points, and more.
Maximizing the Potential of Your Property
A well-thought-out site plan can unlock the full potential of your property. It allows you to optimize the use of available space, taking into account the natural features of the land. Understanding the topography, soil conditions, and drainage patterns through the site plan enables you to position your home in the most advantageous way. By aligning the design with the natural landscape, you can capitalize on scenic views, capture natural light, and implement energy-efficient strategies.
Ensuring Regulatory Compliance
Custom home construction must adhere to various local regulations, zoning codes, and building ordinances. A site plan serves as a critical tool to ensure your project complies with these requirements. It helps you determine setbacks, height limitations, and other building restrictions that may apply to your property. By starting with a well-designed site plan, you minimize the risk of costly delays, redesigns, or even potential legal issues down the road.
Seamless Integration of Design and Landscape
A harmonious relationship between your home's design and the surrounding landscape is essential for creating an aesthetically pleasing and functional living space. The site plan acts as a bridge between the two, allowing architects and landscape designers to collaborate effectively. Proper planning ensures that outdoor areas, such as gardens, patios, and pools, blend seamlessly with the architecture, fostering a unified and inviting atmosphere.
Budget Management and Resource Allocation
Constructing a custom home involves significant financial investments. A site plan helps you allocate resources wisely by offering a clear understanding of the construction requirements. It aids in determining the best locations for utilities, such as water and electricity connections, reducing the cost of extending infrastructure. Moreover, by considering the site's challenges and opportunities from the outset, you can anticipate potential additional expenses and plan your budget accordingly.
Effective Communication with Contractors
Effective communication is PARAMOUNT when building a custom home! The site plan serves as a visual reference that helps you convey your vision to architects, contractors, and other professionals. It minimizes misunderstandings and ensures everyone is on the same page throughout the project.
Conclusion
Don’t neglect the site plan! Its significance lies in its ability to maximize the potential of your property, ensure regulatory compliance, integrate design with the landscape, promote sustainability, and streamline communication. By investing time and effort into creating a comprehensive site plan, you set the stage for a successful, efficient, and peaceful home-building journey. Remember, the old adage holds true: "Failing to plan is planning to fail." So, let your site plan be the blueprint for your dream home's success and your peace of mind!

Getting Utilities on Raw Land: A Journey Through the Expected Costs
Planning to build your dream home on raw land near San Antonio? Discover the ins and outs of utility costs, including electricity, water, natural gas, and sewer (or septic systems). Learn about average price ranges, installation considerations, and valuable tips to navigate the process successfully.
Howdy landowners and future builders! Today, we are exploring the fascinating world of getting utilities on raw land.
We all know that bringing your dream home to life requires more than just imagination and a sturdy foundation. Maybe the need for developing raw land with utilities has never crossed your mind, but it's time to dive into the details you need to know.
The Key Components
Electricity, water, natural gas, and sewer (or septic systems for most areas) are the key players in the utilities game. The cost of getting these utilities on raw land near San Antonio can vary based on factors like location, type of service, and distance from existing lines. But fear not, we’re here to break down what we can!
Utility Cost Breakdown
Electricity: The power source that keeps your lights shining and appliances buzzing. Depending on your home's size and electrical needs, budget between $1,000 and $5,000 to connect electricity to your raw land.
Water: The life force that quenches your thirst and keeps your plants thriving. To get water flowing on your land, set aside around $1,000 to $5,000. Remember, the cost may vary based on your specific location and water service requirements.
Natural Gas: The energy source that warms your hearth and cooks your favorite meals. You'll typically need between $1,000 and $5,000 to bring natural gas to your property near San Antonio. Be sure to check with your local utility company for specific costs and availability in your area.
Sewer (or Septic System): Ah, the unsung hero of waste management. If you're in an area where a septic system is required, you'll be looking at an estimated cost of $10,000 to $12,000. Remember, this option offers you greater independence and flexibility when it comes to waste disposal.
Now, let's not forget about trenching and installation—you can expect to invest between $1,000 and $5,000, depending on the length of the trench and the type of utilities you're installing. It's essential to factor in these costs when planning your budget for utilities.
Keep in mind that these numbers are estimates! Reach out to your local utility company for accurate pricing tailored to your specific situation. They're the experts who will guide you through the process and provide the most up-to-date information.
Tips to Get Started
To help you on your journey, here are a few tips:
1️⃣ Contact your local utility company: They hold the knowledge of available utilities in your area and can provide detailed cost breakdowns.
2️⃣ Seek multiple quotes: Gather quotes from different contractors to ensure you get the best price for trenching and installation.
3️⃣ Be prepared for deposits: Utility companies may require a deposit before connecting your utilities, so plan accordingly.
4️⃣ Patience is key: Remember, Rome wasn't built in a day, and neither will your utilities be connected overnight. It may take weeks or even months to complete the process. Stay positive and stay patient.
So, future custom homeowners, keep your dreams alive, stay informed, and remember that the reward of having your own peaceful oasis is worth the time and money invested. By understanding the costs involved and following these tips, you'll be better equipped to navigate this part of your journey!
If you have any questions or need further assistance, feel free to reach out. We are here to support you every step of the way. Happy building!
P.S. If this is overwhelming and you want nothing to do with setting up your utilities- we hear you! We offer a preconstruction package in which we handle the nitty-gritty details of developing your raw land so your mind can rest easy. Schedule a consultation call and ask all about how this package could work for you!

How to Build Your Home FAST
A delay in material selections for a custom home will delay the whole project. If all of the materials are selected up front, the builder can purchase proactively and swiftly churn through the work. The result is a home-building journey with decreased stress and increased speed- a win-win!
In my personal experience, the single biggest reason projects take longer than anticipated is due to delays in material selections. Now, this may sound like I am blaming the client. FALSE. I am blaming the builder (me). I failed to communicate the importance of timely selections and deadlines. That ends today! It is imperative that ALL material selections be made by the client by the time the house is framed. In fact, by the time the foundation is poured, most selections should be made.
That may sound a bit ridiculous to some of you. That is so early in the construction process!!! To help you understand, allow me to explain what happens between you making a selection and the material being installed. Let’s take tile, for example. Here are the steps that must happen to install your selected tile:
A material “takeoff” needs to be performed. A material takeoff is when measurements are taken from the house plans to determine the needed quantity of a certain material (i.e. tile). Plans do not tell you the square footage of tile in a specific area (i.e. shower). A material takeoff must be performed to determine this quantity. It is simple mathematics, but it does take a bit of time – especially when multiple materials are selected for a certain area. (TIME FOR THIS STEP – 3 TO 5 DAYS)
Retrieve quotes from tile vendors. Once we know the exact amount of tile needed, we can send a quote request to the desired vendor. (TIME FOR THIS STEP – 3 TO 5 DAYS)
Request pricing approval from the client. Since most material selections are linked to “allowance items” (see our earlier blog post about allowances), the client must approve the cost of a material before it is purchased. Continuing the tile example, if there was a $10K allowance for tile material, and the vendor’s quote came back at $11K, then the builder must receive written approval from the client regarding the overage. (TIME FOR THIS STEP – 3 TO 5 DAYS)
Purchase material. Once the quotes are reviewed by the builder and approved by the client, it is time to purchase the material! Very rarely are materials like tile in stock and ready to be picked up. They can have a lead time of a week to months, depending on the tile. (TIME FOR THIS STEP FROM PURCHASE TO READY FOR PICKUP – 3 WEEKS ON AVERAGE).
Install material. (TIME FOR THIS STEP – 5 DAYS)
The steps above must take place for every single material that needs to be selected for your home. As you can see in the tile example, it would be very unwise to wait until the builder was ready for the tile to be installed to make your selection. If you wait that long, there will be major project delays. If all of the materials are selected up front, the builder can purchase proactively and swiftly churn through the work. The result is a home-building journey with decreased stress and increased speed- a win-win!
Are you ready to build a custom home but don’t have a full set of plans?
We explore the two pre-construction pathways for obtaining a full set of plans for your custom home.
How exciting!! You’re ready to build. Maybe you’ve found a floorplan online you like but want to make a few changes. Or maybe you have started talking to an architect to get some rough plans drawn up. We have an earlier blog post detailing the difference between online plans and hiring an architect you can check out, but either way- you’re on the right track! At this point, you have 2 different paths to choose from for the pre-construction phase. You need to have a full set of plans before signing a contract with a builder, and there are two ways to go about obtaining these plans.
A Full Set of Plans
*full set of plans to include (at a minimum) the following:
Site plan – including flatwork & utilities
Floor plan
Reflected ceiling plan
Roof plan
(4) exterior elevations
Electrical plan
Engineered foundation plan
Engineered structural framing plan
The Two Pre-Construction Paths
Path 1: Manage the design phase yourself.
Path 2: Sign a design agreement with a builder.
There is no right or wrong option here. It is totally up to you and your specific situation! We’ll try to lay out the details of each path so you can make the decision that is right for you.
Path 1: Manage the design phase yourself.
Our very first client at JD Rock took this path, and we had an amazing experience with them! Over the course of several months, they took the time to have an architect draw up plans for their custom home and corresponded regularly to ensure every detail was just right. Next, they hired an engineer to engineer the plans. Then, they sent their full set of architectural and engineered plans to multiple builders to bid on their custom home. Thankfully, we won the job and got to work with these wonderful people! The project went smoothly because all of the plans were finalized before we started construction.
I would note – for this project, there was no HOA or official city to deal with. This made the pre-construction phase much easier as the client did not have to seek approval from these entities.
Path 2: Sign a design agreement with a builder.
The second option for the pre-construction phase of your custom home is to sign a design agreement with a builder. This option would work best for somebody who may not feel totally confident managing an architect and engineer on their own. A design agreement hires a builder to manage and coordinate with you, the architect, and the engineer to design the ideal home for you – providing cost projections along the way. By involving the builder early in the process, you’re avoiding the potential mistake of designing a home that is thousands of dollars (or more) over your budget. Just to be clear – a design agreement does NOT necessarily lock you into using this builder to construct your home. At the end of the design phase, you could submit your finalized plans to other builders for pricing and choose the best deal.
So again, there is no right or wrong option here. You need to decide how hands-on you want to be, and how confident you are in managing the pre-construction phase on your own. Ultimately, choose the option that allows you to sleep in peace at night. We will never stop encouraging you to choose the path with the most peace of mind.

Fun and Practical Features to Include in Your Custom Home
If you are planning to build a custom home, you don’t want to miss these fun and practical features to include!
Are you planning to build a custom home soon? We’ve got some fun and practical ideas for you to consider…
Coffee Bar in the Main Bedroom
For you coffee drinkers out there, consider this! How nice would it be to not have to leave your bedroom to get your coffee in the morning? Talk to your architect about running plumbing and electrical to a little nook in your bedroom for some early morning cappuccinos.
Indoor Gun Range
Yeah, we said it. If you have flexibility in your budget, include space for your hobbies in your home. An indoor gun range may not be as expensive as you think – it is actually fairly simple to construct (and yes – it is legal). You can buy a target retrieval system online for less than $1,500. Once all of your walls are soundproofed and padded, and the right lighting is in place – you’re all set for many hours of fun!
Splurge on the Main Shower
Get the rain showerhead. Throw in a body spray or two. Add another showerhead in case you don’t like showering alone. Install a recessed light with a built-in Bluetooth speaker so you can listen to your audiobook. All of these splurges are well worth the minimal extra costs.
Central Vacuum System
Once again – another minimal cost with a high payoff would be a central vacuum system. It is such a pain to have to go grab your vacuum cleaner and plug it in just to vacuum some crumbs off the floor after dinner (parents of toddlers- I know you feel this). Consider installing a central vacuum system with built-in vacuums for all the main rooms of your home!
Hot Tub
Do we really need to sell you on this one? Turn Netflix off, invite your friends over, and end your day in the hot tub on your back patio. You’ll thank us later.
We hope these added flourishes bring you so much enjoyment during, and long after, your custom home build!

Custom Home Interior Designers- Why you need them and what to look for
Interior designers can save you time, money and sanity. Join us on the blog to understand just how much value a designer can bring to your custom home-building team.
Interior designers can save you time, sanity, and money, and create a beautiful space to top it off! In my never-ending pursuit of your peace of mind, I introduce to you the magic of the interior designer.
The Interior Designer Relationship
Let’s first start by explaining how interior designers fit in the relationship with the client, architect, and builder. Chronologically, this is how it roughly plays out. The client approaches the builder with a complete (or near complete) set of plans drawn by an architect. The builder and client work hand in hand with the architect to finalize the plans. At this point, a contractual agreement is made between the client and builder over said plans, and construction begins. It is at this point that the interior designer is brought in – once a full set of plans are complete and no more structural changes will be made to the size/shape of the home.
A Really Good Interior Designer Described
What is an interior designer? Or better yet – what does a really good interior designer do? I have had the pleasure of working with a couple of different designers over the years, and they are worth every penny. Really good interior designers sit down with the client to get an overall feel for the kind of style they hope to achieve in their custom home (modern, rustic, boho, farmhouse, industrial, etc.). These designers will have established relationships with local vendors. They’ll take the client to showrooms to let them see and touch different materials to aid in making selections. A really good designer will have up-to-date design software that allows the client to (for example) see a simulation of their actual shower with their selected tile on the walls. I can’t emphasize enough the peace this provides for the client as they make their selections. They don’t have to hope and pray while they wait for the tile to be installed to see if they like it. Lastly, a really good interior designer should provide a detailed selections packet (signed by the client) to the builder for seamless communication. Designers should be in the weeds with a lot of the decision-making. For example, if I, as the builder, am only told what tile is going on the bathroom shower walls – I am left with many unanswered questions. What color grout? What size is the grout thickness? In what pattern does the client want the tile laid? Is there a shampoo niche? If so, where and what does it look like? How does the edge of the shower tile transition to the bathroom drywall? Is this transition completed with a bullnose tile or a metal trim? If metal – what color? Are you starting to get the idea? This amount of questions may seem ridiculous, but I doubt any client would prefer I attempt to read their mind. A really good interior designer would know what questions to ask and take the time to gain a full and complete understanding of what the client wants.
More Benefits of an Interior Designer
Further, an interior designer will keep your project on track with the selections schedule. This is where a designer really proves their time and money-saving value. Navigating lengthy lead times for materials requires that selections be made early and on schedule to ensure progress is not delayed. A common example is windows. Windows can take months to arrive on the job site, so windows are one of the first selections I require a client to submit. If a client fails to make a selection by the agreed-upon deadline, an extension ranging from days to weeks will be incurred along with a potential financial upcharge. But with an interior designer, you can rest easy and be at peace knowing that you are making all the right decisions at the right time.
Additionally, an interior designer minimizes your likelihood of change orders. I mentioned earlier that a designer has software that allows you to visualize your selections prior to installation. This decreases the need for later changes resulting from not being satisfied with the look of your selections. Every change order automatically adds time and money to your project.
A Design Selections List
It is worth noting that many of the great “interior” designers actually design both the interior and exterior components of the home. Here is a list of all the selections you should expect your interior designer to help you make in your custom home:
EXTERIOR
Windows
Exterior Doors & Hardware
Fiber Cement Siding
Rock & Mortar
Garage Door
Stucco
Lighting
Roof Type & Color
INTERIOR
Drywall Texture
Paint Colors
Trimwork
Interior Doors & Hardware
Cabinets & Hardware
Countertops
Fireplace
Flooring (Wood, Tile, Carpet, etc.)
Shower Tile
Plumbing Fixtures
Appliances
Bath Hardware
Mirrors
Lighting
Are you convinced yet that you need an interior designer on your custom home-building team?

Peace of Mind Starts With Your Budget
What’s your custom home build budget? Should you max out your construction loan? How can you establish a cash reserve? How do you maintain peace during your custom home construction? We discuss these and more in today’s blog.
I worked on 4 different Cost-Plus Contracts in 2022. We unpacked the details involved in this kind of contract in a previous blog, but, essentially, the clients saw all of our numbers on the job and were on the hook for any overages to the budget. For the most part, these projects all came in with budget overages of less than 1% of the project cost (which is amazing!). However, I noticed that when clients selected their finish-out (think lighting, plumbing fixtures, flooring, hardware, all the pretty things), they wished they had a bigger finish-out budget. No matter how small or vast the budget, the client had typically obtained the largest construction loan they could afford. As a result, they tended to feel stressed about every little decision along the way because they could just barely afford the project. This inevitably results in a miserable construction experience for both the client and builder. Financial strain supercharges every decision with emotion.
On a smaller scale, consider a car- I could probably go out today and find somebody to loan me money for a brand-new Lexus with all the bells and whistles. But because this would be a financial strain for me, I could never enjoy the car. I would need to sacrifice my current quality of life and luxuries just for the fancy car. So I would miserably drive the car around town. Is that car really worth it? The same concept applies to a custom home.
I would strongly advise my future clients to not max out on the largest loan possible. I would strongly advise my future clients to have some fluff in their budget so that the unexpected is less stressful and they can comfortably pick their actual favorites when it’s time to select wood flooring and bathroom tile. One strategy I recommend is to budget for 5-10% less than your max in order to establish a cash reserve. Another easy way to have breathing room in your budget is to not build the biggest house possible. If a house costs you $225/square foot, then 100 square feet would cost $22,500. Now, some people reading this may genuinely need the larger home over a nicer finish out. Everyone’s situation is different! All I want to do is encourage you to not bite off more than you can chew with a loan, and remind you that peace of mind is ALWAYS better than a bigger or fancier home. Build something you will love, not something you will regret.

The Truth About Price Per Square Foot
“What is your price per square foot?” This is the first question most often asked of a home builder and is, also, one of the most difficult to answer. Because the answer is more complicated, we want to help you better understand what is truly involved. It would be incredibly unfortunate for a client to hire a home builder under misunderstood conditions.
So- What does the price per square foot mean? There are 2 parts to this equation. The price takes into account the total cost of all labor, materials, and management for the project. The square footage accounts for the total living area (emphasis on the living). The total living area includes all the areas that will receive heating and cooling. Therefore, a garage that does not receive heating and cooling, will not be included. Likewise, porches and driveways do not receive heating and cooling and are also excluded from the square footage.
Here’s an example to illustrate the calculation: Let’s say the house you want to build has 3,000 square feet of total living area, a 2-car garage, and a 40-foot-long driveway. The builder has quoted you $600,000 for the project. Therefore, the price per square foot would be $200 ($600,000 divided by 3,000 SF = $200/SF).
Now, consider building the same 3,000-square-foot house with a 4-car garage and an 80-foot-long driveway. Even though the total living area has not changed, the builder will be unable to build the home for $200 per square foot because he has to pay extra for the additional garage and driveway labor and materials. Because the total cost increased, the price per square foot will also increase. The same would be true if the square footage remained the same, but you decided to have all of the walls painted by a renowned artist or selected all appliances from Italy. When the total cost rises, the price per square foot must follow.
Hopefully, these examples make clear that the price per square foot is most impacted by the decisions of the client NOT the home builder. All custom home builders provide the exact same service. They hire the labor and purchase the materials to build exactly what you want. The same tile setter would be hired to install $1/square foot tile or $50/square foot tile. The same plumber would be hired to install standard Home Depot plumbing fixtures or the most expensive Kohler fixtures. When you see a “famous” home builder on Instagram posting photos of a gorgeous mansion in a celebrity neighborhood, they provide the exact same service as a home builder who builds a modest ranch house in the middle of nowhere. The price per square foot may be wildly different between the two, but both builders did the same thing- they managed the building of a custom home.
What distinguishes a builder is NOT their price per square foot; but their approachability and integrity. If you are considering building a custom home, you should absolutely get multiple bids on your house from builders in your area. You will find that they quote you roughly the same price per square foot. However, you should take the time to get to know each builder and determine whether or not you trust them. Determine whether or not you would be willing to communicate with them for the next year or so as they build your home. Then make the decision to hire the overall best home builder for YOU.

What to Expect When Expecting a JD Rock Custom Home
Bringing a new custom home into the world can feel a lot like bringing a child into the world. We outline what to expect when building a custom home with JD Rock in order to give you peace.
The custom home building journey is similar to that of bringing a child into the world. You are signing up for months of anticipation, a substantial expense, moments of uncertainty, moments of overwhelming joy, and inevitable labor pains with the ultimate reward of a new creation- “home”- on the other side. So what should you expect when embarking on this creative journey with JD Rock Construction?
Quality Work
We do not cut corners at JD Rock. For us, everything starts and ends with licensed engineers and inspectors. We will not commence a home build until we have a full set of engineered foundation and structural plans. Additionally, we won’t turn the house over to you until our work has passed all inspections. There is always the potential to save both time and money on a project by avoiding these professionals, but that is a risk we are not willing to take.
Honest Communication
Throughout the construction process, we will send you weekly updates on the progress of your home. These updates include considerable accomplishments on the project, recent purchases, snags we’ve encountered, as well as deliverables needed from you! Chiefly, we want to be honest with you. In construction, mistakes do happen. However, we hope that transparency will result in your trust and, ultimately, an enjoyable experience for us all!
True Custom Home Build Experience
We are not a hybrid-custom home builder. In a hybrid-custom experience, you may have limited options to choose the color of your walls, the tile size in your shower, etc. We are a true custom home builder. The sky’s the limit. If you find a sink you like on Pinterest, we’ll use it. If you’re into rustic cedar siding that only comes from Canada, we’ll get it down here. Your style is our style. If you aren’t ecstatic about your product selections, the objective of a custom home has not been achieved.
Quality work, honest communication, and a true custom home build experience are what set a JD Rock custom home build apart. We hope these fundamental pillars give you peace and confidence as you begin and prepare to meet your own custom home.

Help! I Just Decided to Build a Custom Home- Where do I start?
Four steps to set your custom home build up for success.
*Disclaimer- We are going to assume you have already done your homework to ensure that you are in adequate financial positioning to build your dream home, and that you will be able to acquire a construction loan for the project. We may do a separate blog on this one day. For now – we’re assuming this portion has already happened.*
You just made the decision to build your dream home and are wondering where to start. So exciting! To kick things off and get the ball rolling, you should follow these chronological steps:
Obtain your property plat. When you purchased your property, it should have come with an official plat. A plat is a document drawn up by a surveyor which outlines (dimensionally) your property’s borders and any easements. Along with this document, you should reach out to your homeowners association (HOA for short) or the city to determine setback restrictions. Typically, neighborhoods will not allow you to stick your house wherever on your lot you so desire. They will outline how many feet from the street, how many feet from neighboring properties, and how many feet from the rear property line your house can sit. It is so critical that before you even begin designing your dream home or shopping for the plan online, you know where your house is legally allowed to be positioned on the property.
Obtain your HOA’s rules and restrictions on what you can and cannot build. They will mention things like – “minimum square footage of 2,500 SF” or “minimum of 75% of exterior walls must be composed of masonry, brick or rock”. Make sure you understand what you can and cannot construct.
Now for some fun- it’s time to get your plans drawn up! We will post a blog soon on “Should I Purchase Plans Online or Hire an Architect”. If you are going to purchase plans online, please make sure you first send a link of the plans (BEFORE YOU PURCHASE) to your HOA or the city (whoever you need permission from) for their approval. Once you buy plans online, you cannot return them. It is a permanent transaction. If you are hiring an architect, make sure they build a relationship with the HOA or city and are aware of all requirements and restrictions. One important note I’ll make on this step – spend the money on a site plan. Ask your architect if this is a service they provide. A site plan will show exactly where the house is going to sit on the property and illustrate the driveway layout, any sidewalks, existing trees that will remain, the pool, etc.
Find a home builder. Check out our blog on “Important Questions to Ask a Potential Custom Home Builder” for help on this step. The builder will want to see your plans before they can give you an accurate bid. If all you have is a general square footage, they can only give you, at best, a ballpark price per SF. Send your plans to 2 or 3 builders so you can get apples to apples bids.
Hopefully you now feel prepared to commence your custom home build with as smooth a process as possible. You can do this!